In the world of business management, QuickBooks has established itself...
Read More
If you are switching your data from QuickBooks Online to Desktop and you don’t know how to do it then you are on the right path. This article can help you to transfer vital data from Online to Desktop, just stick to it and read it carefully. You can also send data from QBO to QB Enterprise, QB Premier or QB Pro Solution. One of the major reasons behind this is that the QB Desktop version has more features than QBO.
However, this process may require some technical knowledge, if you don’t want to risk your data for the company then get in touch with us. Don’t hesitate, call us immediately. We have a panel of experts that will make sure that you are provided with the best possible support.
Merits of QuickBooks Desktop over QuickBooks Online
QB Desktop is a good option for accounting services and conglomerates which needs to maintain many books of the companies. It keeps track of products and inventories. It is considered a good option for companies related to products. There is a summary mentioned below just have a look at it:
- Advanced inventory management
It provides a First in First out method for the management of the inventory. You can also track inventory using 2nd method named Addition Average Cost. This 2nd method comes with the Add-on module for Advanced Inventory.
- Industry-specific customizations
QB Desktop comes with many customizations for every type of industry like Wholesale, retail, manufacturing, contracting, nonprofit, general business, and professional services.
- Batch invoicing method
It also helps the user or business owner to serve the invoices easily when you are holding multiple businesses. It also helps the user to send multiple invoices.
- Manage multiple accounts
It helps the user to support the multiple files of the companies but it is not true as you can handle one company file per one subscription.
Points to be noted before migrating from QuickBooks Online to Desktop:
It is always noted that QBO and QB Desktop have many differences that may cause many issues and problems.
- User should always update QB Desktop to minimize the problems.
- User should avoid exporting data related to multicurrency from QBO to QB Desktop as it might not correctly present or displayed.
- One should use a browser i.e. Internet Explorer.
- Some words are not available in QB Desktops like audit logs and estimates. You can export these records as PDF.
- Some restrictions are also available like vendors, employees, and customers for every version of the QB Desktop. You need to update while the limits exceed the allowed numbers.
- One should familiar with the process of exporting the data from QBO to QB Desktop.
5 Simple Steps To Export Data From QuickBooks Online to Desktop
Important: It is always recommendable to log in using Admin credentials to start the process of conversion.
Step 1: Check the Security Settings of the browser i.e. Internet Explorer
To execute the process efficiently, the user has to review the settings of the Internet Explorer.
- Locate the icon of the browser Internet Explorer.
- Right-click on it.
- Click on the option Run as Administrator.
- Now click on the icon tools.
- Click on the internet options.
- Now choose the option security and trusted sites.
- Choose the option Sites.
- In the option Add this Website to the Zone Field, enter the *.intuit.com *.qbo.intuit.com
- Un-Check all the sites in the Zone for the required server verification.
- Close that window Trusted Sites.
- Also, make sure that you should uncheck the option Enable Protected Mode.
- Click on the tab Apply.
- Hit OK.
- Lastly, close the Internet Explorer.
Step 2: Set the software QB Desktop to export the vital files
- Initially locate the icon of the QB Desktop. (If you haven’t downloaded it yet, download & install it)
- Select the option Run as Administrator.
- Visit the file of the QB.
- Select the option Close Company.
- Make sure to leave the QB open while performing the above-mentioned steps.
Step 3: Prepare to export the Data
- Access the version of the QB Desktop to which you want to send the vital data of the QB Company.
- Login using the credentials in the QBO.
- Click on the Gear icon.
- Select the option Export Data.
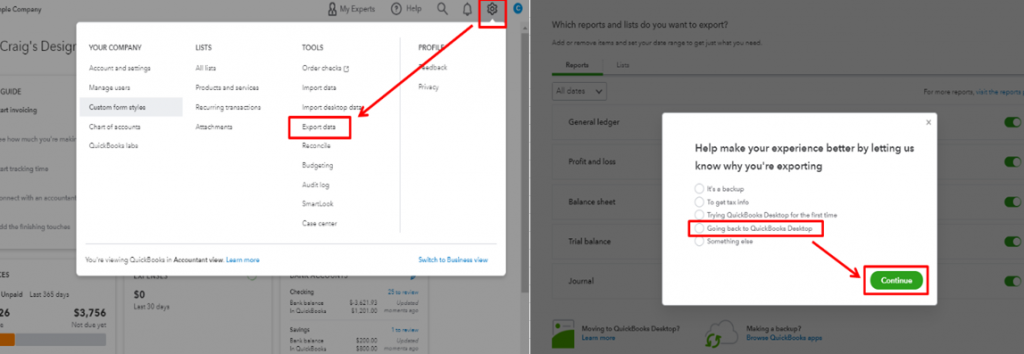
- You have to mark the appropriate option for exporting the data.
- Hit Continue.
- Select the option Learn more.
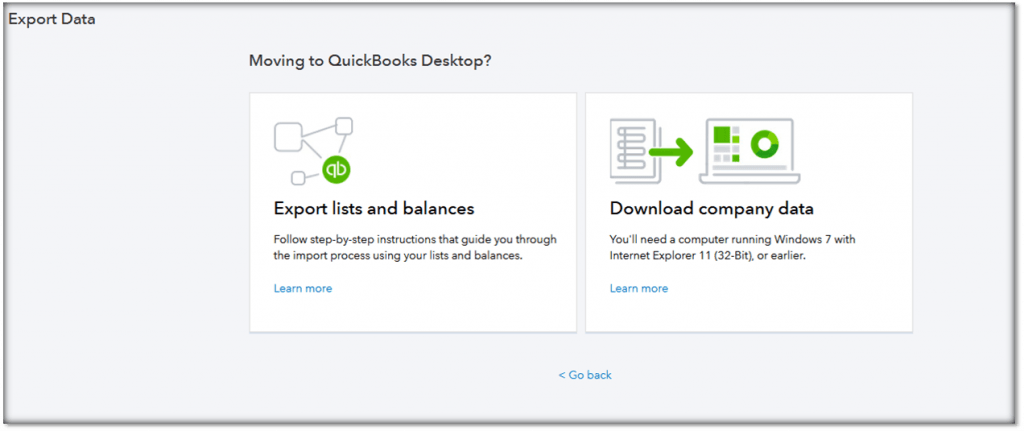
- Click on the option Moving to QuickBooks Desktop.

- Choose the option Learn more again.
- Now select the option Download company Data.
- Check the data using the screen export overview.
- Click on the icon Get Started.

- Now select the option Install ActiveX control.
- Consider the steps to install ActiveX.
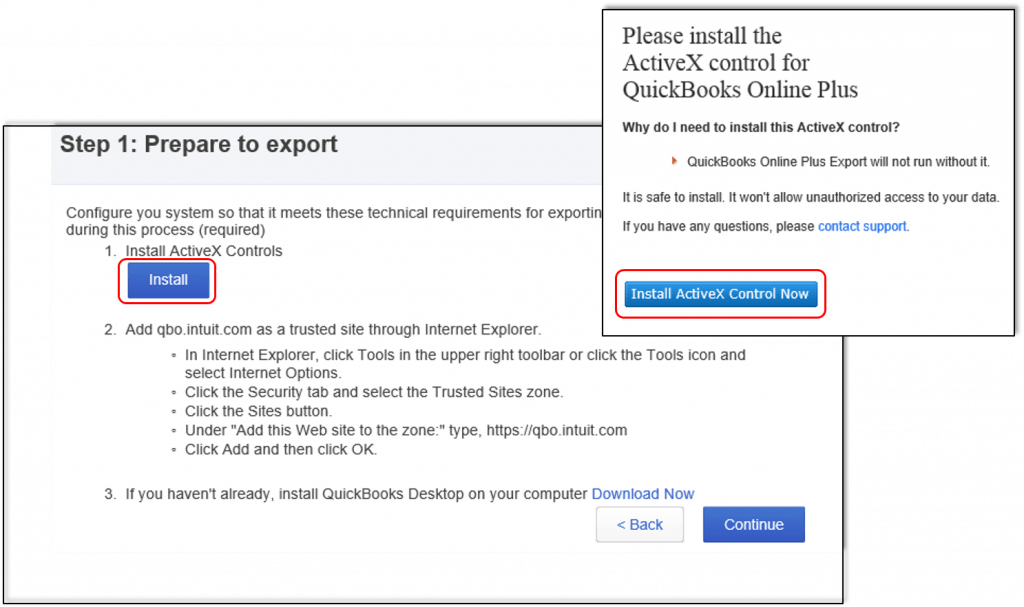
- After completion of the installation process, click on the icon Finish.
- Now choose the data which you want to send or export.
- Hit tab Continue.
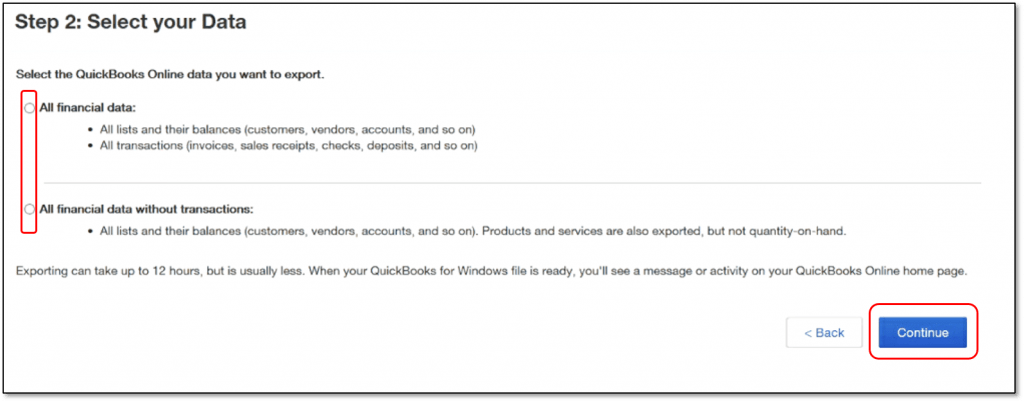
- Check the limitation.
- Hit Continue.
- Add the contact info.
- Hit Continue.
You will get an e-mail notification that the data is ready to Export. It requires some time i.e. 2-3 minutes. User will get the message after a long period for multiple files of the companies.
Step 4: Finish Export of the vital Data
To initiate the process of QBO, you have to perform some of the few steps to locate the Export Page.
- Initially visit the tab Setting.
- Go for option export.
- Now repeat 2-5 steps mentioned earlier in Step no. 3.
- Similarly, prepare to export the data of QBO to QB Desktop.
- Select Continue.
- Now open the QB Desktop.
- The user should now ensure that “no company open screen” is appearing.
- Locate the file of the company.
- Now close the file of the company.
- The user should download it back in QBO.
- Save the file of the company.
- Locate the location for saving the vital file of the company. (Choose place other than Windows Desktop)
- After downloading go to the tab Convert Now.
- Open the window Create a new QuickBooks file, provide a name to the file and set a path to store or save it. It is also recommended to choose the location in the Local System, not on an external drive or network.
- Hit Finish whenever the export of the data is done.
It is always noticed that the process takes some time to come to an end. If the screen freezes this doesn’t mean that the process is aborted. It requires some minutes to execute the process. Just wait a while the status bar will start moving.
If Status Bar does not Appear
Because of the Application Certificate, the user has to check the QB Desktop.
- Click on the icon of the QB Desktop.
- Whenever the Application Certificate prompts, the user has to select Yes.
- Select continue whenever a new window appeared.
- Similarly, whenever the confirmation window appears you have to hit done.
Step 5: Verifying the information of the Data Exported
After a successful export of the data of the company, you are welcomed to use the report profit and loss to make sure that the books match or not. User should make sure that the reports in the QB Desktop are the same as that of QBO.
If reports do not match then consider the mentioned steps:
It is many times noticed that the reports do not match because of limitations of on the export.
- Open QB Desktop.
- Go to the File menu.
- Select option “close company”.
- Now by considering step 4, try to convert the file again.
- Whenever the process finishes, try to check the reports.
Step 6: Cancel QBO (optional)
If you don’t want QBO any longer then terminate your plan.
Just consider the steps mentioned here:
- Look at the Exporting Lists.
- Read all the information properly.
- To print the entire list, tap on Print.
- Now read the printed information.
- Choose the tab Next.
- Select the option Export.
- This may open the window named Create New QuickBooks File.
If Lists & Transactions are chosen then follow the steps mentioned here:
- Use the arrow key to choose the version of the QB to which the user has to convert the file of the company.
- Hit the option Next.
- Read and understood all the mentioned information.
- Click on the link for printing the entire list of details.
- Read it carefully.
- After going through the details, hit Next.
- Now the user has to confirm the E-mail address, name and lots more.
- Tap on the option Prepare Data.
- After preparation of the data to export completes hit OK.
- You will get a mail that confirms you to download the file of the company.
- Select the options mentioned below:
I’m moving my data to QuickBooks Desktop edition
or
I’m canceling my QuickBooks Online subscription
- Select the option Next.
- Again hit Next.
- Select the option Download.
- Now consider a path to store the file that is exported.
- Choose the option Save.
- Read and Understand the information carefully.
- You should confirm that the QB Desktop is running properly but no file on the company is opened.
- Choose button Convert.
Note: You will get a message for accepting or rejecting the Digital Certificate and then choose Allow
- Consider a particular path in the window named Create New QuickBooks File to export the files.
- Type the name of the file of the company.
- Hit Save.
Note: When progress is made a progress is displayed on the user’s screen.
- Hit Finished.
- Open QB.
- Select any File of the company.
- Go for option Restore or Open Company.
- Select appropriate options to Open a company file.
- At last, hit Next.
- Visit the path where you want to save the file of the company.
- Choose it.
- Hit Open.
Final Note..!
Hopefully, you are now well considerate about the process to Export/Migrate/Switch/Transfer/Move/Change/Covert QuickBooks Data From Online to Desktop. If you are not able to perform the task then don’t hesitate to call us immediately. We have a team of experts available 24*7 hrs for customer help.
![How to Fix QuickBooks Error 1603? [Installation or Updating HTML Error]](https://quickfixbookserror.com/wp-content/uploads/2023/12/QuickBooks-Error-1603-1024x576.jpg)


 1-877-589-0392