
QuickBooks has been taking into account the needs of accountants, entrepreneurs, and businesses as one of the most effective solutions for today’s fast and digital business environment. However, it is important to note that despite its flawless performance, the users face some issues such as QuickBooks Error Code =1304. This error is mainly caused by problems in the CD or DVD drives; or installation files, and interferes with the normal running of the software with such messages as “Error writing to file (filename).” Our article intends to provide a roadmap for navigating through this digital maze by providing vital information relating to the causes, and symptoms, as well as possible cures for QuickBooks Code C=1304 Error. This article covers the entire procedure and guide and best practices of the workforce when dealing with this particular error to ensure quick and effective eradication. So here, we guide you to avoid QuickBooks Error Code C=1304 and to help you continue benefiting from the powerful QuickBooks tools and services that are out there.
What is QuickBooks Error Code =1304?
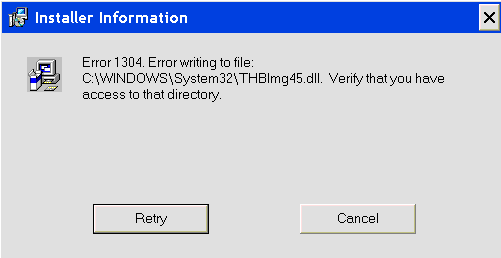
QuickBooks is a very famous accounting software. It helps lots of accountants, entrepreneurs, and businesses to handle and maintain the books effectively. Users also face many errors and glitches from time to time. QuickBooks Error 1304 is also a common error faced by users. This can be encountered by the user when the CD Drive is not functioning properly. This may appear when there is no access to the directory. The message and window that appeared are:
- Message: “Error writing to file (filename)”.
- Window:
You can resolve this error by just contacting us. Just call us and get your problem resolved. This article can also help the user to eliminate it. Just stick to this article that will guide you about its causes, symptoms, and its effective solutions.
Other Errors that may appear are listed below:
- QB Error 9
- QB Error 21
- QB Error 342
- QB Error 343
What are the symptoms of QuickBooks Error 1304?
Some of the major symptoms are as follows:
- You will see a message on the screen indicating the occurrence of the error.
- The window will crash down.
- It abrupts the installation process of the QB.
- The software does not perform perfectly.
- Users may feel some lag and glitches.
- The console is not able to render the input values.
What are the causes of QuickBooks Error 1304?
The major causes for the existence of this error are:
- CD Drive problems are the main cause of this error.
- Due to the damaged CD drive or CD is corrupted or CD is not functioning properly.
- Because of damaged Microsoft .Net files.
- Due to the outdated version of the QB.
How to fix QuickBooks Error Code C=1304?
Now all the readers are well considerate about Quickbooks error 1304. It’s time to have some knowledge about its solutions. If you are not able to cure this error properly then contact us immediately. Some of the effective solutions are mentioned below just have a look:
- Replace the files using the CD for Installation
- Perform System Restore
- Use the Reimage Repair Tool
- Install the .NET Framework or Repair it
- Using a different system share CD-ROM in a Network
- Use the copied folder for the installation of QB
Solution 1: Replace the files using the CD for Installation
To rectify this error, one should replace the installation files of the QB using the installation CD. Follow the mentioned below:
- Initially replace the installation files to HDD from CD Drive.
- Insert the QB CD into the Drive.
- Whenever the process of the installation starts, click on the option ‘QUIT”.
- Visit the C: drive.
- Make a new folder
- The user needs to Paste the files to the freshly created folder.
- Look at the left pane of the window.
- Select the option Organize.
- Tap on the icon New Folder.
- Rename the newly created folder.
- Just provide a new name: “QuickBooks”.
- Have an eye on the left pane of the windows.
- Right-click on the QB CD icon.
- Tap on Explore.
- Find QB, 3rd party folders, and look in the Right-Pane.
- Click on the file setup.exe.
- The user needs to press & hold the key “Ctrl”.
- Select the files and folders.
- Right-click on the highlighted folder.
- Copy it.
- Locate the QB folder.
- Right-click on that folder.
- Choose the option Paste.
- Look at the folder where the files of the QB are copied earlier.
- Install QB by double-clicking on the file setup.exe.
- At last, follow the on-screen instructions to finalize the installation process.
Solution 2: Perform System Restore
To resolve this error manually you have to perform the system restore. To do so steps are:
- Initially login as Administrator in QB.
- Tap on the Start button.
- Consider the path:
- All Programs—– > System tools—– >Accessories
- Choose the option System Restore settings.
- In the Growth window, the user should select the button “Restore my computer to an earlier mature”.
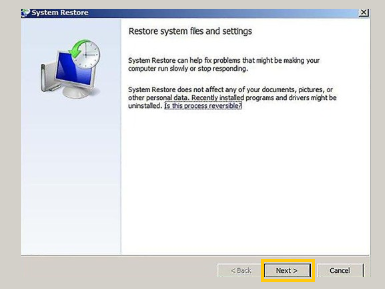
- Hit Next.
- At last, restart the workstation.
Solution 3: Use the Reimage Repair Tool
This Re-image tool helps you to scan, diagnose, and repair the errors. To repair any error using this tool, follow the steps mentioned below:

- Initially download the tool.
- The user needs to find the location of the file.
- After locating the file, double-click on it.
- Now the process of the installation begins.
- A window User Account Control (UAC) has appeared on the screen.
- If you don’t want to control the programs then continue to tap “Yes”.
- A welcome screen has appeared.
- To allow the tool to scan for the error, the user needs to make sure that the checkbox appears to remain un-tick.
- Hit the Install button. (This tool will install automatically but the user should ensure a proper internet connection)
- You will notice that the scan for the error begins.
- You will be going to know the damaged areas of the workstation when the scan process finishes.
- Look at the right corner at the bottom, and click on the button ‘Start Repair’.
- At last, restart the workstation.
Solution 4: Use the copied folder for the installation of QB
To use this solution you have to install QB using the copied folder in the HDD. The steps are:
- Locate the file using the QB folder.
- Go for the installation process by clicking on the file “setup.exe”.
- Just follow the on-screen instructions to complete the installation process.
- After completion of the whole process, restart the workstation.
Solution 5: Using a different system share CD-ROM in a Network
- Using the same network, use a different workstation
- Initially insert the QB CD for installation.
- Whenever the process begins, tap on the button Quit.
- Now the user has to access the File Manager of Windows.
- Right-click the icon CD-ROM.
- Choose the option Sharing and Security.
- The user needs to check the mark on the checkbox Share this folder.
- Choose the option Apply.
- Hit OK.
- Locate the icon of the My Computer.
- Right-click on it.
- Go to select the Computer Name.
- The user just needs to choose the Full Computer Name.
- Open the Run window on the workstation where you want to install QB.
- On the search bar of the Run windows type “\\(name of the computer having the QuickBooks CD)”.
- Press Enter using the keyboard.
- Click on the CD Drive icon in the My Computer.
- Just Double-tap on the file to initiate the process of the installation.
Solution 6: Install the .NET Framework or Repair it
This .NET Framework is a major component of the QB software. If it is corrupted then it abrupts all the process of the QB. If it is creating any problem then just install the Framework of the windows again.
Conclusion
You can easily eliminate this issue by just implementing any of the above-mentioned methods. You have to follow the steps carefully and if you face any problem then contact us. We have appointed a 24*7 hrs QuickBooks user support team to help you.
FAQs
Q. How can I identify QuickBooks Error Code C=1304?
QuickBooks Error Code C=1304 is a system error that commonly occurs during installation and it may display messages such as “Error writing to file (filename).
Q. Does reinstalling Microsoft .NET Framework help with Error Code C=1304?
Yes, reinstalling or repairing Microsoft could work and this is why it is the best option for now. QuickBooks Error Code C=1304 can be fixed by NET Framework since damage to framework files can cause the error.
Q. What should I do if QuickBooks Error Code C=1304 occurs during installation?
QuickBooks C=1304 Error Code may appear at the time of installation and its solutions could include the replacement of the installation files with that of the CD, system restoration or using the Reimage Repair Tool.


 1-877-589-0392